Applying DTF transfers has revolutionized the way custom designs are brought to life on fabric, capturing the attention of both amateur crafters and seasoned professionals alike. This innovative process, known for its vibrant colors and detailed prints, enables users to transfer intricate designs effortlessly onto various textiles. In this guide, we’ll uncover essential DTF printing tips and the step-by-step guide on how to apply DTF transfers effectively. Understanding the DTF transfer process can significantly enhance your apparel printing outcomes and ensure your creations stand out. Whether you’re looking to make unique gifts or launch a small business, mastering the art of direct to film transfers will elevate your printing game to new heights.
The technique of direct to film (DTF) printing has emerged as a powerful tool for those passionate about textile design. This state-of-the-art method allows creators to produce stunning artworks with seamless precision on a wide range of fabric materials. By exploring the adhesive application process and learning how to apply DTF transfers with confidence, you’ll unlock the potential for remarkable customization. As we delve deeper, this guide will walk you through each stage of the transfer application, sharing insights that are sure to enhance your printing experience. Embrace this modern approach and discover how it can invigorate your creative projects!
Understanding the DTF Transfer Process
The DTF transfer process is an innovative method harnessing the capabilities of modern printing technology to transfer designs onto fabrics. At its core, this process involves printing a design onto a specialized film, which is then coated with a hot melt adhesive. Once the design is printed and the adhesive applied, a heat press machine is used to transfer the image from the film onto the target material, resulting in stunning, durable prints. This technique has quickly gained popularity among textile enthusiasts due to its ability to produce vibrant colors and intricate details.
Understanding the nuances of the DTF transfer process is crucial for achieving professional results. Factors such as the choice of ink, film quality, and adhesive compatibility all play pivotal roles. Additionally, mastering the settings on your DTF printer and heat press—specifically temperature, pressure, and timing—can significantly influence the adherence and longevity of the final product. With a little practice and experimentation, you can optimally leverage the DTF transfer process to enhance your textile customization efforts.
How to Apply DTF Transfers Effectively
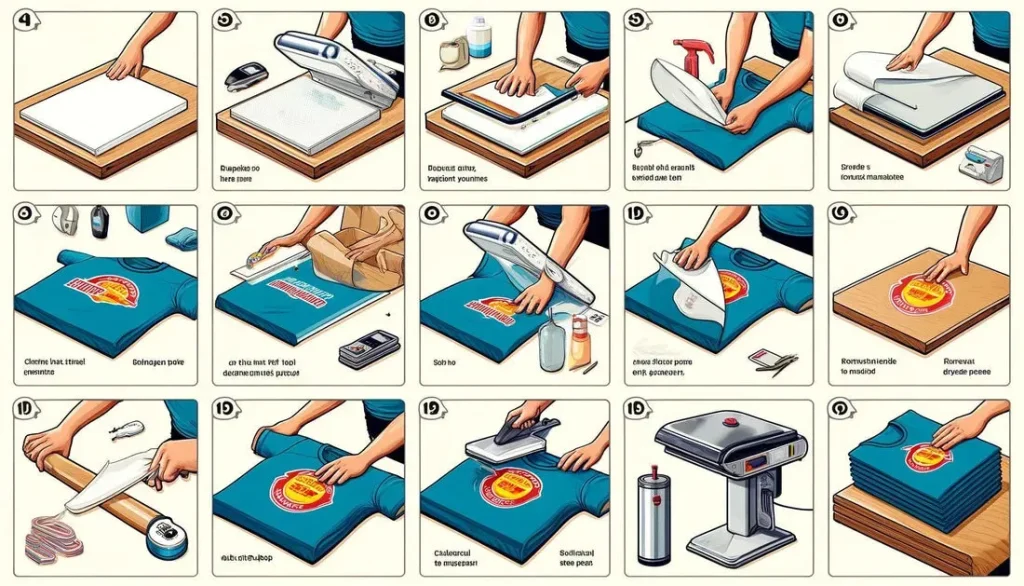
Applying DTF transfers effectively requires careful preparation and attention to detail. Start by designing your artwork in a graphic design software, ensuring it’s in the best format for printing—typically PNG or PDF. Size your design appropriately to fit the garment without distortion. Once you’re satisfied with the design, print it on DTF transfer film, ensuring you select high-quality print settings for improved vibrancy. The moment your design prints, you’ll need to apply the adhesive powder to the wet ink, as this is crucial for ensuring optimal adherence.
After applying the adhesive powder, it’s important to cure the transfer properly. This is where heat and time work in tandem to set the adhesive and bond it with the ink. A heat press is often preferred for this step, as it allows you to control the pressure and temperature accurately, facilitating consistent results. Once cured, the next important step is applying the transfer to the desired fabric. Ensure the surface is clean and smooth before using medium pressure during the heat press application to securely transfer your design onto the fabric.
DTF Printing Tips for Superior Results
To achieve superior results with DTF printing, several tips can enhance both the printing and pressing process. Start by experimenting with your heat press settings; fabrics can react differently to heat, so conducting a test run on a scrap piece is advisable. This allows you to fine-tune the temperature and pressure to find the optimal settings for each fabric type. Additionally, selecting the right fabric is crucial—DTF transfers generally perform best on cotton or cotton-blend materials, which yield vibrant prints and good durability.
Regular maintenance of your equipment is another vital tip for successful DTF transfers. Keeping your heat press and printer clean prevents residue buildup, which can negatively impact the quality of your prints. Furthermore, proper storage of your DTF films and adhesive powders, away from moisture and light, can prolong their usability and effectiveness. By following these DTF printing tips, you can significantly enhance the quality and longevity of your custom apparel.
Direct to Film Transfers Versus Traditional Methods
When comparing direct to film (DTF) transfers to traditional printing methods, DTF stands out particularly for its ability to produce high-fidelity results with intricate designs. Unlike heat transfer vinyl or screen printing, which may struggle with complicated images and vibrant gradients, DTF transfers excel in delivering detailed prints with rich color depth. This is largely due to the DTF process using specialized inks and films that allow for a superior transfer of detail onto fabric.
Additionally, DTF transfers offer flexibility in terms of the fabrics they can adhere to, making it a versatile option for various textile projects. This method can print on a range of materials—including cotton, polyester, and blends—while still maintaining excellent durability. As a result, many designers are increasingly favoring DTF transfers for their projects, recognizing that this method provides an efficient and high-quality choice for custom garment production.
Best Practices for DTF Adhesive Application
The application of DTF adhesive is a critical step in ensuring that your designs adhere correctly and last over time. One of the best practices is to apply the adhesive powder while the ink is still wet; this average coat ensures the adhesive properly binds to the ink during the heat curing process. Sprinkling the adhesive evenly across the design helps avoid any weak spots, which might result in premature peeling or lifting after application.
Moreover, curing the adhesive appropriately is essential to the success of your DTF transfers. Employing an oven or using a heat press allows for controlled heating, solidifying the bond between the adhesive and the printed ink. Monitoring the temperature and curing time according to specific product specifications will lead to optimal results, enhancing both the durability of the design and the overall quality of the print.
Troubleshooting Common DTF Transfer Issues
While applying DTF transfers can yield impressive results, various issues may arise during the process. One common problem is improper adhesion, which often stems from inadequate curing of the adhesive or incorrect heat press settings. To troubleshoot this, double-check your heat press temperature and timing—ensuring they align with manufacturer recommendations can mitigate most adhesion problems.
Another issue can arise with the print quality itself, such as fading or inconsistent colors in the design. This can usually be traced back to the choice of DTF film or the quality of the inks used. Always ensure high-quality DTF transfer films are used, and perform test prints to confirm color accuracy before executing on the final garment. By being proactive and addressing these common issues, you can enhance your DTF transfer results and ensure a more reliable production process.
Frequently Asked Questions
What is the DTF transfer process and how does it work?
The DTF transfer process involves printing a design onto a special film using a DTF printer, then applying adhesive powder while the ink is wet. After curing the adhesive with heat, the transfer can be applied to fabrics using a heat press. This method ensures vibrant colors and detailed designs.
How to apply DTF transfers effectively?
To apply DTF transfers effectively, start by preparing your design and printing it on DTF transfer film. After applying adhesive powder and curing it, position the transfer on the fabric and heat press it for the recommended time. This ensures a strong bond between the design and the fabric.
What are some important DTF printing tips for beginners?
For beginners, important DTF printing tips include using high-quality settings on your printer, experimenting with heat press temperature and pressure, and ensuring the fabric is clean before application. Also, practice on scrap material to refine your technique before working on final pieces.
What is the ideal fabric for applying DTF transfers?
The ideal fabric for applying DTF transfers is cotton or cotton-blend materials. While DTF transfers can also adhere to polyester, the quality may vary, so it’s best to start with suitable fabrics for optimal results.
What should I know about DTF adhesive application?
When applying DTF adhesive, it’s crucial to sprinkle the adhesive powder evenly over the wet printed design. Proper curing with heat is essential to ensure that the adhesive bonds strongly to the ink and fabric, enhancing the durability of the transfer.
How can I improve the durability of DTF transfers after application?
To improve the durability of DTF transfers after application, you can press the design again for a few seconds after it has cooled. This extra step helps reinforce the bond between the printed design and the fabric, extending the life of your custom apparel.
| Step | Key Actions | Tips |
|---|---|---|
| Step 1 | Create your design using graphics software, ensuring proper format & size. | Use PNG or PDF formats for the best results. |
| Step 2 | Load DTF film and print your design with high-quality settings. | Use white or light-colored films to enhance color vibrancy. |
| Step 3 | Sprinkle adhesive powder over the wet print and cure in heat press or oven. | Coat evenly to prevent weak spots; cure at 160-180°C. |
| Step 4 | Cure the transfer to set the adhesive using the appropriate heat and time. | Usually, 30-60 seconds of curing is sufficient. |
| Step 5 | Position transfer on fabric and apply heat & pressure. | Ensure the fabric is clean and dry for best results. |
| Step 6 | Allow cooling before peeling away the film to ensure proper adhesion. | Peeling too soon may cause lifting. |
| Step 7 | Optionally, press again for durability. | This helps the design withstand wear. |
Summary
Applying DTF transfers involves a systematic approach that combines precise design preparation, printing, and careful transfer application. This innovative printing method not only offers impressive detail and vibrant colors but also provides an accessible way for both enthusiasts and professionals to create custom apparel. By following this guide and understanding each step, you can successfully master DTF transfers, enabling you to bring your creative visions to life on fabric. Whether you’re looking to personalize your wardrobe or start a custom apparel business, the skills you develop in applying DTF transfers will significantly enhance your textile printing capabilities. Explore more and join the DTF printing community to further refine your techniques!